Monday, August 29, 2011

Zucchini Fritters Recipe


We are getting lots of zucchini in our CSA, and I am having fun finding different ways to cook it.  Zucchini fritters are delicate, fried nuggets of joy!  They have a nice crispy outside and a soft, sweet middle full of summer flavor.

These were so easy to make and are a great accompaniment to any meal.  My husband and I couldn’t get enough of these and I can’t wait to get a few more zucchini in our CSA basket to make them again!


Zucchini Fritters Recipe
Makes 12 Fritters
Recipe by Simply Recipes

1 lb of zucchini (about 2 medium sized), coarsely grated
Kosher salt
Ground black pepper
1 large egg
2 scallions, finely chopped
1/2 cup all-purpose flour
1/2 cup olive oil

 Salt the zucchini with about 1 teaspoon of salt. This salting will help to remove the excess moisture from the zucchini.  In addition to salting, make sure to squeeze out any additional liquid. 

Next, whisk egg in a large bowl.  Then add the zucchini, flour, scallions, and 1/4 teaspoon of pepper.  Mix the ingredients well to combine. 

Heat the oil in a large skillet over medium heat.   Once the oil is hot, cook fritters in two batches to not crowd the pan and help the oil maintain its temperature.  Drop six mounds of batter {about 2 tablespoons each} into the oil.  Flatten the fritters slightly, turning once, until browned, 4-6 minutes on each side.

Transfer to a paper towel-lined plate to help absorb any excess oil.  Sprinkle with salt. Repeat the cooking process with the remaining batter.  Serve immediately.

Tips:
1)      After I grated my zucchini, I put it in a colander over the sink with salt to start to strain the extra moisture while I worked on getting the other ingredients together.   
2)      I didn’t have any scallions, so I used some minced yellow onion.  Remember, you can always adapt a recipe to what you have in your kitchen.
3)      I served these fritters as is, but you could serve with sour cream or a Greek yogurt sauce if you want to get fancy. 

Thursday, August 25, 2011

Mac n' Goat Cheese Recipe


We had some goat cheese left over from the Mango & Goat Cheese Quesadillas.  I had lots of visions for how to use the leftovers, but they were all too typical for what I was in the mood for; in a salad, over some scrambled eggs, or with some crackers.  I wanted to get creative and try something new, so I came up with this Mac n’ Goat Cheese recipe. Genius! I love when I can get my creative mind churning in the kitchen to come up with a fun new recipe. 

This mac n’ cheese is creamy deliciousness with a tangy twist from the goat cheese.  This dish definitely tastes as good as it looks.  So jump right in because you are going to love it. 


Mac n’ Goat Cheese Recipe
Serves 2-3

2 tablespoons butter or margarine
2 tablespoons flour
1/2 cup milk
4 ounces goat cheese
1/4 chopped green onion
1/2 lb. mini pasta (mini shells or elbows)

First, bring 3 quarts of water {seasoned with salt} to a boil.  Once at a rolling boil, add your pasta and cook until al dente. 

In the meantime, start to make your cheese sauce while the water is boiling.  The start of this cheese sauce is a simple roux of butter and flour.  Add butter into a pan over medium heat and melt.  Once the butter is melted and turns frothy, whisk in the flour slowly.  The butter will absorb the flour and create a thick paste.  Once a thick paste is formed, slowly whisk in the milk.  Over time, your roux will melt into the milk and begin to thicken the sauce.  Whisk in goat cheese until melted.  Season with salt and pepper.  

When the pasta is al dente, strain and move to a serving bowl.  Pour the cheese sauce over the pasta and add the green onion.  Stir well to coat all of the pasta with the cheese sauce.

Enjoy!

Thursday, August 18, 2011

Sour Cream Coffee Cake Recipe


Sour cream coffee cake is a huge family favorite.  My mother always makes this cake for special occasions, as her mother did when she was growing up.  Now I am following the tradition and making it for special brunches, vacations, etc.  Who doesn’t love a cinnamon sugar stripe through their cake with a nice cup of tea on the side?

This cake is so decadent.  The cake is similar to a dense, buttery pound cake {this is the magic of the sour cream} and then the cinnamon ribbon going through the middle makes every bite sweet.  I like to use the Ina Garten recipe below, which adds a maple glaze on top.  The glaze not only makes the cake even more beautiful but adds a subtle hint of maple flavor. 

Sour Cream Coffee Cake Recipe
Recipe from Ina Garten
Preheat oven to 350o

For the cake:
12 tablespoons (1 1/2 sticks) unsalted butter at room temperature
1 1/2 cups granulated sugar
3 extra-large eggs at room temperature
1 1/2 teaspoons pure vanilla extract
1 1/4 cups sour cream
2 1/2 cups flour
2 teaspoons baking powder
1/2 teaspoon baking soda
1/2 teaspoon kosher salt

For the streusel:
1/4 cup light brown sugar, packed
1 1/2 teaspoons ground cinnamon
1/4 teaspoon kosher salt
3 tablespoons cold unsalted butter, cut into pieces
3/4 cup chopped walnuts, optional

For the glaze:
1/2 cup confectioners' sugar
2 tablespoons real maple syrup

Grease and flour a 10-inch tube pan.

Cream the butter and sugar in the bowl of an electric mixer for about 5 minutes, until light and fluffy. Add the eggs into the creamed butter mixture 1 at a time, then add the vanilla and sour cream.

In a separate bowl, sift together the flour, baking powder, baking soda, and salt. With the mixer on low, add the flour mixture to the batter until just combined. Finish stirring with a spatula to be sure the batter is completely mixed.

For the streusel, place the brown sugar, flour, cinnamon, salt, and butter in a bowl and pinch together with your fingers until it forms a crumble. Mix in the walnuts, if desired.

Spoon half the batter into the pan and spread it out with a knife. Sprinkle with 3/4 of the streusel. Spoon the rest of the batter in the pan, spread it out, and scatter the remaining streusel on top. Bake for 50 to 60 minutes, until a cake tester comes out clean.

Let cool on a wire rack for at least 30 minutes. Carefully transfer the cake, streusel side up, onto a serving plate. Whisk the confectioners' sugar and maple syrup together, adding a few drops of water if necessary, to make the glaze runny. Drizzle as much as you like over the cake with a fork or spoon.

** This cake went so fast I didn't get a chance to take a photo of a slice :) 

Sunday, August 14, 2011

Mango Goat Cheese Quesadilla Recipe


It is always fun to mix up textures, flavors and typical ingredients to make a fantastic meal.  My cousin inspired to me to make these mango and goat cheese quesadillas for dinner one night, and oh boy am I glad she did.  The combination of the sweet mango with the soft, tart goat cheese is out of this world.  Each bite has amazing layers of flavor that tickle all of your taste buds making this dish irresistible.

I baked these quesadillas in the oven, but feel free to fry them with a little oil or grill them open faced.  We had them for dinner, but these would also serve as a great appetizer or a snack.  You would really impress your guests pulling these off of your grill and serving them as an appetizer. 
The sky is the limit with this flavor combination.  If you like feta more than goat cheese, then make the switch.  Use this as a starting point and see where it can take you.   


Mango Goat Cheese Quesadilla Recipe
Makes 2 large quesadillas
Preheat oven 350o

4 large flour tortillas
2 mangos, peeled and cubed
1 lime, zest and juice
1/3 cup chopped green onion {scallions}
1/2 cup fresh chopped cilantro, additional for garnish
5 ounces goat cheese

In a large bowl, combine the cubed mango, 1 teaspoon of lime zest, fresh squeezed lime juice, green onion and cilantro.  Mix all the ingredients together and let sit aside to meld the flavors together.   

On a large baking sheet, place 2 flour tortillas down.  Spread the mango mixture evenly over the two tortillas.  Sprinkle the goat cheese over the top and cover with the remaining two tortillas.

Bake in the oven for 15-20 minutes until the tortilla is crispy and the goat cheese has slightly melted down.

Enjoy!  


Tips:
1)      This was the first time I had ever cut a mango.  I wasn't sure what the proper technique, so I looked up a tutorial video. 


2)     As noted above, feel free to grill or fry these as well.
3)     Use different flavor combinations, strawberries and goat cheese or peaches and feta.  Get creative. 

Friday, August 12, 2011

Tomatillo Salsa Verde Recipe


Since we have joined the CSA, I have been introduced to some amazing produce of all different varieties.  This past week we received tomatillos from the farm.  I will admit, I was very intimidated to cook with them.  The tomatillos have an inedible, paper-like husk surrounding most of the beautiful green vegetable.  Once the husk is peeled off, the outside flesh is a bit sticky, so make sure to wash them well before cooking.  

The process for making the salsa was simple and smooth.  Once I got over my fear of cooking with a very unfamiliar ingredient, I put on some good music in the kitchen and got to work.  We served the salsa over grilled chicken, but I can’t wait to use my leftovers on enchiladas or even just with some nacho chips.  Next time you see tomatillos at your local farmers’ market, purchase them and you will be pleasantly surprised!   


Tomatillo Salsa Verde Recipe

1 pound tomatillos, husked
1/2 cup finely chopped onion
1 teaspoon minced garlic
1 serrano chile pepper, minced
2 tablespoons chopped cilantro
1 tablespoon chopped fresh oregano
1/2 teaspoon ground cumin
1 ½ teaspoons salt
1 1/2 cups water

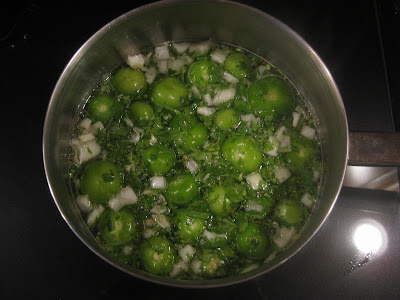
Place the tomatillos, onion, garlic, and chili pepper in a medium sized sauce pan.  Next, season with the cilantro, oregano, cumin and salt.  Cover everything with the water.   

First, bring the mixture to a boil over high heat.  Then, reduce the heat to medium-low and simmer until the tomatillos are tender, about 10-15 minutes.

Using a blender, carefully puree the tomatillo mixture in batches until smooth.  Serve over grilled chicken, fish, enchiladas or with nacho chips as an appetizer. 


Tips:
1)      I didn’t have some of these ingredients in my pantry, so I substituted some, and it came out great.  Here are what I switched some things out for: 
onion = green onion (scallions)
1 serraon chile pepper = 1 jalapeño pepper
1 tablespoon fresh oregano =  1 teaspoon dried oregano
2)      This sauce makes a lot, so I was able to freeze some of it for later. 
3)      I used my immersion blender for the pureeing process. 

Tuesday, August 2, 2011

Sweet Zucchini Bread Recipe


Growing up, my parents have always had a huge garden in their backyard with gorgeous fresh vegetables.  I have so many memories of picking fresh tomatoes, peppers, cucumbers and the largest zucchini you have ever seen!  These fresh vegetables would always be a side dish with our dinner, and sometimes a special baked treat!

I love when vegetables can be transformed from the typical savory dish into a sweet, delicate, and delicious delicacy.  My mom is a wonderful baker and would always take her enormous zucchini and bake the most beautiful breads.  This bread is amazing with a cup of tea for breakfast or snack.  They also freeze really well, which allows you can savor the summer taste of zucchini all year long.  Baking this bread always makes my house smell so sweet, I wish I could bottle it up!


Sweet Zucchini Bread Recipe
Recipe from the Joy of Cooking
Makes one 9x5-inch loaf
Preheat oven to 350o

1 1/2 cups flour
1 teaspoon baking soda
1 teaspoon baking powder
1/4 teaspoon ground cinnamon
3/4 cup sugar
2 eggs, beaten
1/2 cup vegetable oil
1 teaspoon pure vanilla
1/2 teaspoon salt
2 cups grated zucchini, squeezed of excess moisture

Whisk together the flour, baking soda, baking powder, cinnamon, and sugar in a medium sized bowl.  Set this mixture aside.

In a second large bowl, blend the sugar, eggs, oil, vanilla and salt together until smooth.  Next, stir in the dry ingredients until well incorporated.  Then add in the zucchini.  Once fully blended, scrape the batter into the greased loaf pan.  Bake the bread until the bread pulls away from the sides of the pan, about 50 minutes.  Cool the bread in the pan on a rack for 10 minutes before trying to remove the bread from the pan. 

Enjoy!

Tips:
1)      The key to making a great zucchini bread is to remove all excess moisture from the shredded zucchini.
2)      Add in 1 ½ cups of chopped pecans or walnuts to add a crunchy texture to the soft bread.
3)      Change it up a bit and add 1 ½ cups of mini chocolate chips
4)      If you have lots of zucchini this summer, bake a few batches of this bread and freeze it for the winter!
Related Posts Plugin for WordPress, Blogger...